How to get started with GrowNode on Ubuntu 18.04 and 20.04 - Easy version
Updated on January 18, 2022
Introduction
With this step-by-step tutorial you will be able to quickly deploy the Eclipse IDE with the GrowNode development environment on your Ubuntu 18.04 or 20.04 workstation.
At the end of the tutorial you will have:
- installed the Eclipse IDE
- installed the ESP-IDF plugin for Eclipse
- installed the main packages required to GrowNode
- installed the latest ESP-IDF environment
- compiled and run your first GrowNode test board via Eclipse
Notes:
- The same steps should also apply for Ubuntu 18.10 and 20.10, but we haven't tried yet. Let us know if you did!
- Older versions of Ubuntu do not satisfy the minimal requirements out-of-the-box, so they are not officially supported by GrowNode.
- This procedure could be also used to create an Ubuntu virtual machine to play with GrowNode without affecting your system. Read more details on this in the Appendix below.
Prerequisites
- at least 5.5 Gb free space on hard drive
- at least 4 Gb RAM
- an ESP32 board with USB cable
The ESP32 board could be a ready-to-use one (like the Wemos D1 R32), or other more compact ones that need some soldering (like the ESP32-DevKitC V4 and D1 Mini ESP32).
Step 1: Prepare your system
Before starting installing any software, you need to prepare your system downloading some basic packages.
Open a terminal and type this commands:
sudo apt-get install git wget flex bison gperf python3 python3-pip python3-setuptools cmake ninja-build ccache libffi-dev libssl-dev dfu-util libusb-1.0-0
mkdir -p ~/esp
Then, you can make your serial devices always accessible with:
sudo usermod -a -G dialout $USER
The latter command becomes effective only once you re-login to your workstation. So, it's better if do a logout/login procedure (or a restart) now to avoid forgetting it :)
Step 2: Installing Eclipse IDE for C/C++ Developers 2021-09
This is the latest version officially supported by the plugin, and you can get it following these steps:
- download it from this page selecting the Linux package that corresponds to your architecture (most probably it is the one called x86_64) in the "Download Links" column
- open a terminal and move to the folder where you downloaded the tar.gz file (usually
~/Downloads) - use the following commands to extract Eclipse from the compressed file and make it available for use in the whole system:
sudo tar xf eclipse-cpp-2021-09-R-linux-gtk-x86_64.tar.gz -C /opt
sudo ln -s /opt/eclipse/eclipse /usr/local/bin/
-
(optional) if you want to add a desktop icon to avoid launching Eclipse from terminal you need to create a shortcut:
-
open a terminal and launch:
sudo nano /usr/share/applications/eclipse.desktop -
paste the following text into the new empty file and press
CTLR+xto save it:
-
[Desktop Entry]
Version = 2021-09
Type = Application
Terminal = false
Name = Eclipse C/C++
Exec = /usr/local/bin/eclipse
Icon = /opt/eclipse/icon.xpm
Categories = Application;
-
run Eclipse using the command
eclipsefrom a terminal, or by using the Eclipse icon in your desktop (if you created it) -
at the first start, Eclipse will ask for the default workspace folder. Click on "Browse...", select the folder called
espinside your home, click on "Open" and then on "Launch"you may also select "Use this as the default..." if you are going to use Eclipse only for GrowNode
Step 3: Installing the ESP-IDF plugin for Eclipse
Once Eclipse is launched, do as follows to install the ESP-IDF plugin:
- close the "Welcome" tab
- select "Install New Software" from the "Help" menu
- click on "Add...", a new window opens
- enter:
- Name: Espressif IDF Plugin for Eclipse
- Location: https://dl.espressif.com/dl/idf-eclipse-plugin/updates/latest/
- click on "Add"
- select the whole "Espressif IDF" tree, as in figure, and then click on "Next >"

- click again on "Next >"
- select "I accept the terms..." and then click on "Finish"
- if a warning about unsigned packages appears, click on "Install anyway"
- at the end of the process click on "Restart Now"
- if a sort of error window appears, close it and re-launch Eclipse manually
Step 4: Download the ESP-IDF environment from Eclipse
Now you are ready to download the ESP-IDF environment from Eclipse:
- select "Download and Configure ESP-IDF" in the "Espressif" menu
- in the "Download ESP-IDF" box select the "master" version and the folder
espyou created before, as in figure
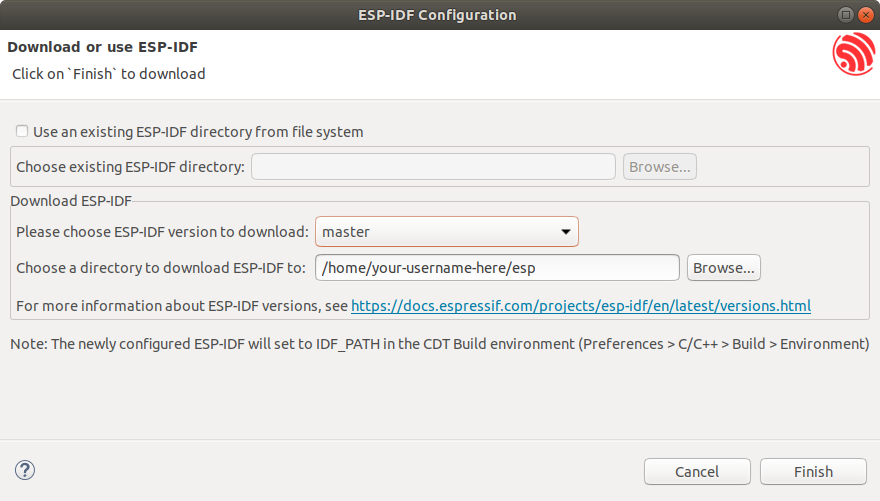
- click on "Finish"
- in the Console area you will see the status of ESP-IDF download
- when the download is ended, click on "Yes" in the pop-up window asking to install some new tools
- in the popup window fill the fields as in figure
- ESP-IDF Directory: this field should be already filled with the right path
- Git Executable Location:
/usr/bin/git - Python Executable Location:
/usr/bin/python3
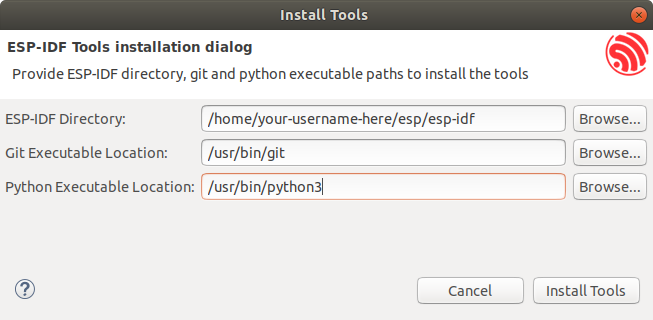
- click on "Install Tools" and monitor the installation in the status bar at the bottom right
Step 5: Download GrowNode and build it
Once the tool installation of the previous step is finished, import your first GrowNode project doing:
- select "Import..." from the "File" menu
- select "Git" > "Projects from Git" from the list and click on "Next >"
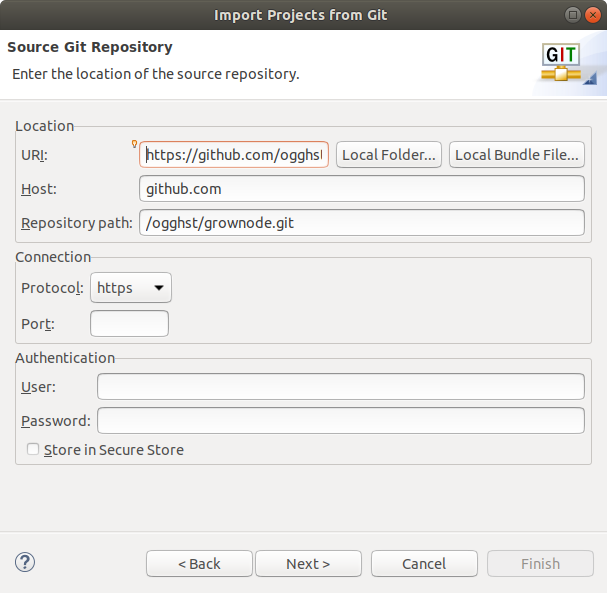
- select "Clone URI" from the list and click on "Next >"
- fill the field "URI" with
https://github.com/ogghst/grownode.gitand the remaining fields will auto-complete, as in figure, and click on "Next >"
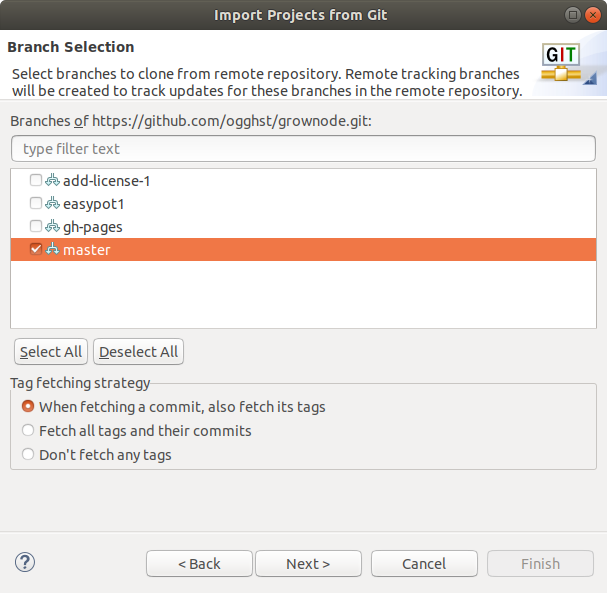
- unless you are interested in other branches, select only the "master" branch, as in figure, and then click on "Next >" (with smart import)
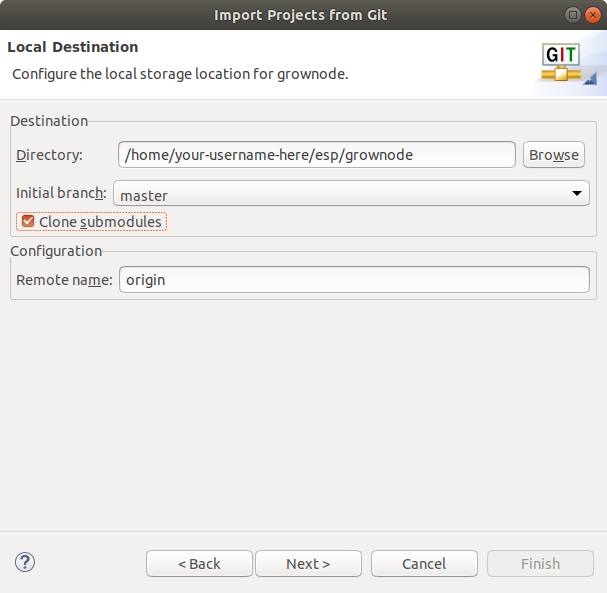
- change the "Directory" field setting a
grownodefolder inside theespfolder you created before and flag the "Clone submodules" option, as in figure; click on "Next >"
-
click on "Next >" in the following window, leaving unchanged the selection of "Import existing Eclipse projects"
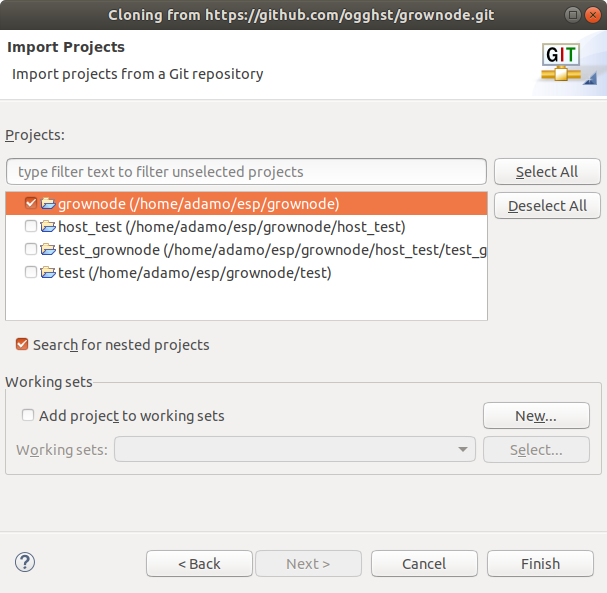
-
unless you are interested in other projects, select only the
grownodeproject from the list, as in figure, and click on "Finish"
...and here you go! GrowNode is imported into Eclipse. Well done! In the Project Explorer on the left you can see the GrowNode workspace:
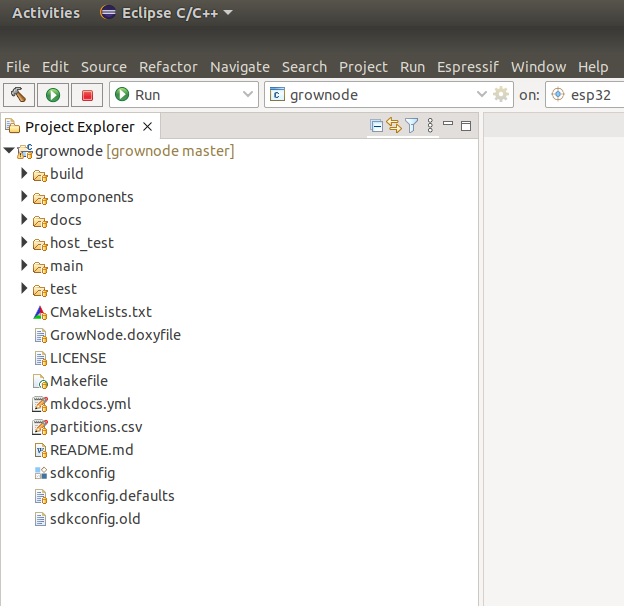
Try your first build by clicking on the hammer icon at the top left, or typing CTRL+B.
In the console at the bottom you should see your project compiling and ending with the message Build complete (0 errors.... That means it was successful. Great!
Step 6: Flash your board from Eclipse
Before flashing you must complete some configuration steps:
- click on the setting gear beside "esp32" in the top icon bar (see point 1 in figure)
<../img alt="ESP32 serial port in Eclipse" src="img/eclipse_flashing_settings.png">
- select the right "Serial Port" from the list (the one you identified while installing ESP-IDF, most probably
/dev/ttyUSB0) and click on "Finish"
Now plug your board into the USB port and click on the green play icon on the top left, or type CTRL+F11. Eclipse will start the flashing procedure (it's possible it will re-build the project before) and if everything goes well you should see the following message:
Leaving...
Hard resetting via RTS pin...
Executing action: flash
Running ninja in directory /home/your-username-here/esp/grownode/build
Executing "ninja flash"...
Did you?! Yes? Perfect! Congratulations!
If the answer is no, probably you need to manually set the serial port speed and re-trigger the flashing procedure:
- click on the setting gear beside "grownode" in the top icon bar (see point 2 in the figure above)
-
in the "Arguments" section add the following bold parameter exactly in the same position:
idf.py-b 115200-p /dev/your-serial-device-id flash
Step 7: Monitor the serial output of your board from Eclipse
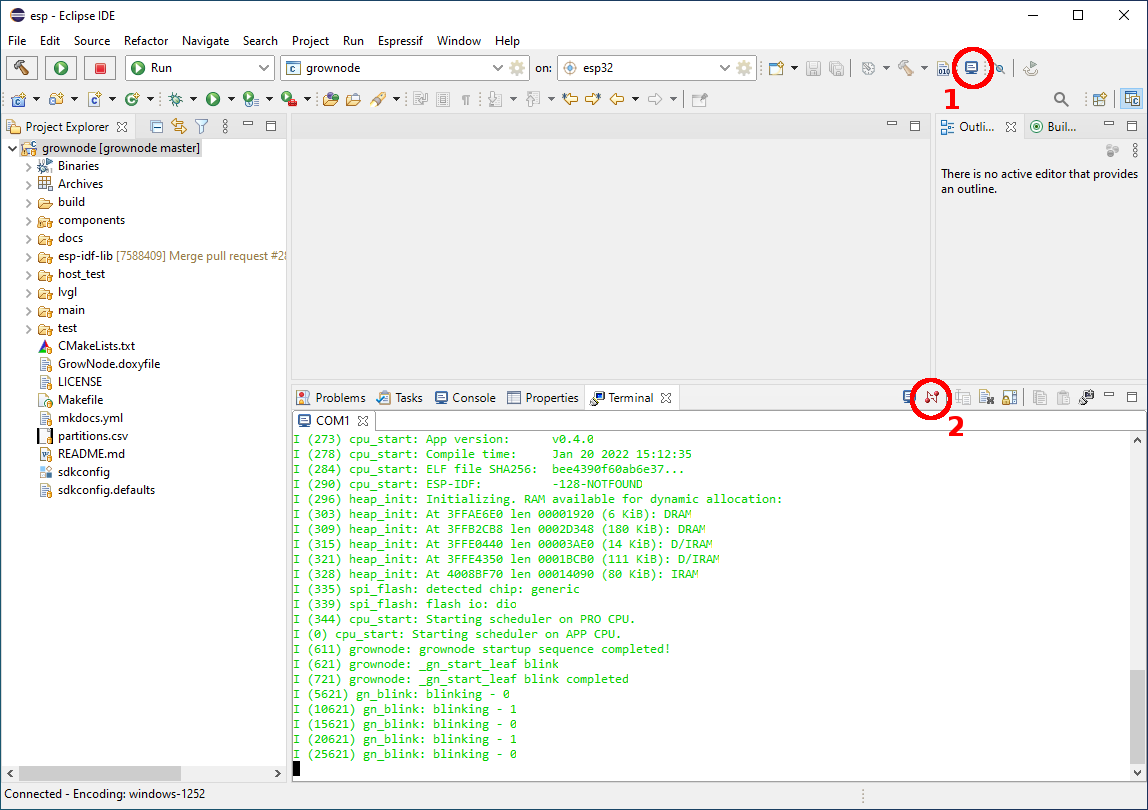
To start the ESP-IDF monitor click on the icon "Open a Terminal" in the top icon bar (see point 1 in figure below). Check the correctness of the serial port and then click on "Ok". The board will restart you you will see the "blinking" messages.
To stop the monitor, just close the "Terminal" window or click on the red "Disconnect Terminal Connection" at the top right of the terminal itself (point 2 in figure below).
Great job! You are ready to play more with GrowNode ;)
Appendix
A. How to get the name of the serial device associated to the ESP32 board
The procedure differes depending on if you are working or not inside a virtual machine. Let's see the two cases.
If you are NOT working inside a virtual machine
In this case, the host serial device associated to the ESP32 board is usually called /dev/ttyUSB0.
If you want to check the actual name, follow these steps:
- open a terminal
- plug the USB cable
- type the command
dmesg -
a line with a text similar to the following should appear at the end of the log, indicating the name of your new serial device in place of
your-serial-device-id:usb 1-1: ch341-uart converter now attached toyour-serial-device-id -
use the name
/dev/your-serial-device-idwhen flashing your board or when looking at debug messages through a serial monitor (i.e., in steps 4 and 5 replace/dev/ttyUSB0with the/dev/your-serial-device-idyou discovered here)
If you are working inside a virtual machine
In this case the serial device depends on the way you set up the virtual machine. If you are using VirtualBox and you followed the instructions below, your serial device will depend on the COM you selected as "Host Device":
COM1corresponds to/dev/ttyS0COM2corresponds to/dev/ttyS1- ...and so on.
B. Installing GrowNode into an Ubuntu virtual machine using VirtualBox
If you wish to create a new Ubuntu virtual machine (VM) from scratch using VirtualBox just to have a try of GrowNode without affecting your system, you can still install the software environment inside the VM following the instructions of this page.
How to create an Ubuntu VM using VirtualBox is out of scope here. You can find many guides about this topic on the web.
When working inside a VM you have to be aware of the following issues/requirements in order to be able to flash and properly work with your board:
- you must link the host serial device to a VM serial device
- you must plug the board via USB BEFORE starting the VM
- you should never unplug the board while the VM is running
- you will probably need to manually set the flashing baud rate to 115200 baud (as explained at the end of Step 4 above)
Properly link the host and guest serial ports
In VirtualBox, open the "Serial Ports" tab of the VM settings, shown in figure.
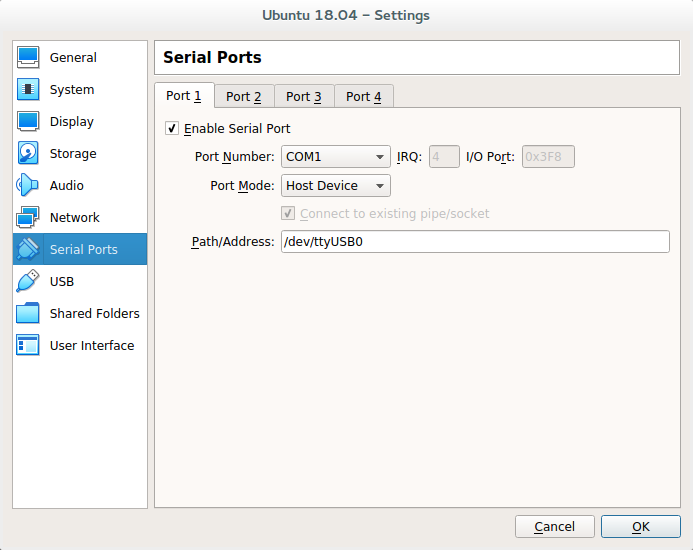
To properly set the serial communication, you have to:
- flag "Enable Serial Port"
- select the "Port Number" from the list (
COM1will be ok in most cases) - select "Host Device" in "Port Mode"
- write the name of the host serial port into the "Path/Address" field > Follow the instructions of the previous section "If you are NOT working inside a virtual machine" to identify it